
How to Prep Your Walls Before Painting: A Step-by-Step Guide to Patching and Sanding
The "Invisible" Wall: 6 Pro Secrets to Making Drywall Patches Disappear Forever
Introduction: The Heartbreak of the Raking Light
There is a specific kind of heartbreak known only to the home restorer. You spend the entire weekend meticulously applying compound. You roll your premium topcoat perfectly. The room looks pristine. But then, the late afternoon sun hits the wall.
In that low-angle raking light, the ghosts appear. Raised ridges, dull blotches, and the faint outline of every repair suddenly scream at you. If you want a flawless finish, you must know how to prep walls before painting properly. As we say in the trade, a flawless finish is 90% preparation and 10% patience.
Making drywall patches truly vanish is not about magic. It is simply a matter of physics and the quiet discipline of muscle memory. Most homeowners focus entirely on picking the perfect paint color. However, without elite wall preparation, even the most expensive paint will highlight your underlying mistakes.
Whether you are tackling a quick living room refresh or embarking on a complete kitchen renovation, the rules of surface preparation remain identical. The goal is an invisible transition between the old surface and the new repair. Here are the professional secrets to achieving exactly that.
The Mystery of "Flashing" (Why Your Paint is Lying to You)
When you prep walls before painting, you might notice that a patch remains visible even when it feels perfectly flat to the touch. You are likely dealing with a frustrating phenomenon known as "flashing." Flashing occurs when light reflects differently off the patched area compared to the rest of the wall.
Terminology: What is Flashing?
Flashing is an uneven finish where patched or repaired areas appear noticeably duller or shinier than the surrounding painted surface. It is caused by variations in the porosity and texture of the substrate underneath the final coat of paint.
Many DIYers mistakenly blame the paint quality when flashing occurs. The reality is much deeper. It is an issue of surface porosity. Joint compound is a thirsty, highly porous substrate. If you do not seal it properly, it will behave entirely differently than the painted wall around it.
"Flashing isn't just about color. It is a direct result of differences in texture and absorption between new mud and old paint. Contractors often face challenges because they are painting with a product that is designed to be a topcoat, directly over a fresh substrate."
Warning: Never Skip the Primer
Skipping the prime coat is the ultimate corner-cutting mistake. When you apply a topcoat directly over fresh mud, the patch sucks the moisture out of the paint rapidly. A dedicated sealer, like a high-quality multi-purpose primer, is non-negotiable for a flawless blend.
The "Wide and Thin" Rule: The Art of Feathering
To make a small hole disappear completely, you must have the courage to create a much larger repair area. This counterintuitive concept is known in the industry as the "Wide and Thin" rule. It is the cornerstone of professional drywall finishing.
If you stop spreading your mud exactly at the edge of a hole, you create a sharp boundary. We call this "picture framing." It leaves a raised ridge that paint can never hide. Your ultimate goal is to create a "zero edge." This is where the joint compound tapers into the wall so gradually that the transition is completely imperceptible to the human eye.
Key Tip: Your Tool Choice Matters
Using a 10-inch or 12-inch taping knife is essentially a cheat code for the novice. The wider blade physically forces you to spread the mud further out from the center. This makes a gradual, invisible taper significantly easier to achieve than using a small putty knife.
The mechanical secret to achieving this zero edge lies in your hand pressure. It requires practice, but mastering this specific movement will change the way you prep walls before painting forever. Follow this specific motion to perfect your feathering technique.
Step-by-Step: The Perfect Feathering Motion
Hold the knife correctly: Keep the handle held closely to the wall in the direction of your travel. This naturally reduces unwanted downward pressure.
Start heavy on bare wall: Begin your pull with firm, heavy pressure on the bare wall just outside the patch area.
Ease off over the center: As the blade moves across the center of the wet patch, gently ease off the pressure to leave more material behind.
Increase pressure at the exit: Increase your hand pressure again as you reach the opposite side to perfectly taper the final edge.
Mid-Article Summary: The Golden Rule of Edges
Always remember: a feathered edge you cannot feel with your bare hand is an edge you will never see under a fresh coat of paint. Trust your touch as much as your eyes.
Why You Should Stop Just "Mudding Over" Screw Pops
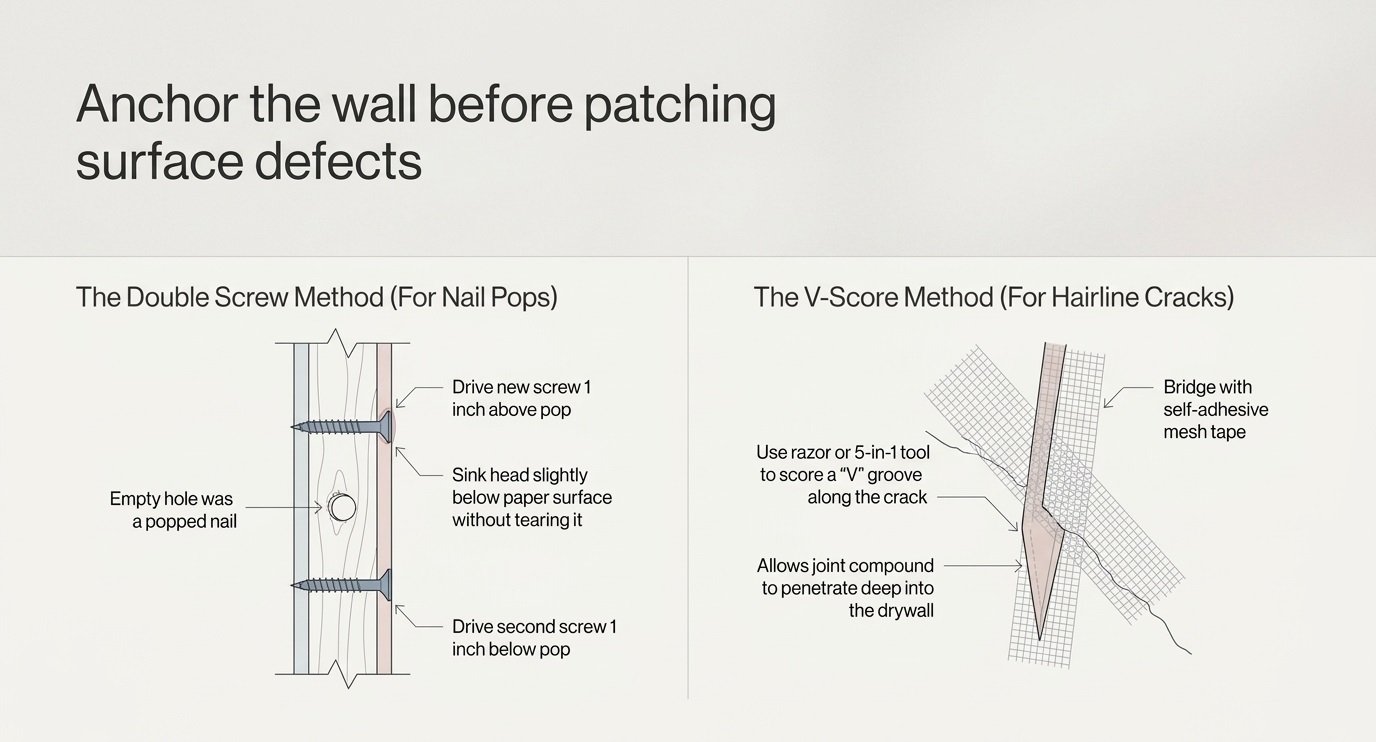
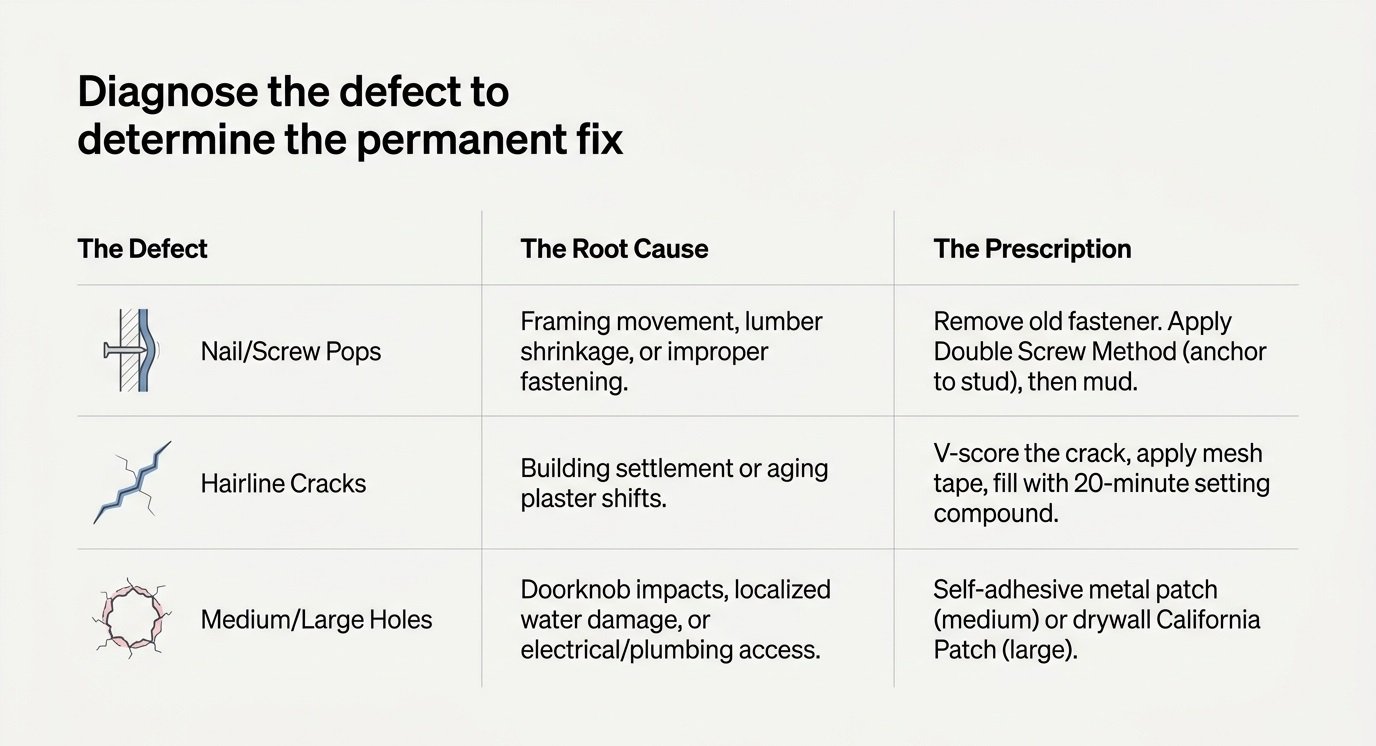
Every homeowner has seen them: those annoying little circular bumps protruding from the drywall. A screw pop is rarely just a simple surface blemish. It is actually a symptom of underlying framing movement or the natural drying and shrinking of lumber behind the wall.
Simply covering the protruding bump with a thick layer of joint compound is a temporary, failing fix. The house will continue to shift, and that pop will reappear within months. To master the repair and permanently prep walls before painting, you must first stabilize the sheetrock completely.
Actionable Checklist: The Hyde Tools Method for Screw Pops
- Assess the fastener: Check if the screw is totally stripped or if it completely missed the wooden stud behind the wall.
- Remove or sink: If stripped, remove it entirely. If it is still anchored, carefully sink it just below the surface. Dimple the paper gently without tearing it.
- Drive anchor screws: Drive two brand new drywall screws into the stud. Place one about an inch above the failure point, and one an inch below.
- Bypass the weak zone: This specifically bypasses the weakened "pop" zone and anchors the panel securely before any mudding begins.
The "Butterfly Patch": The No-Tape Miracle
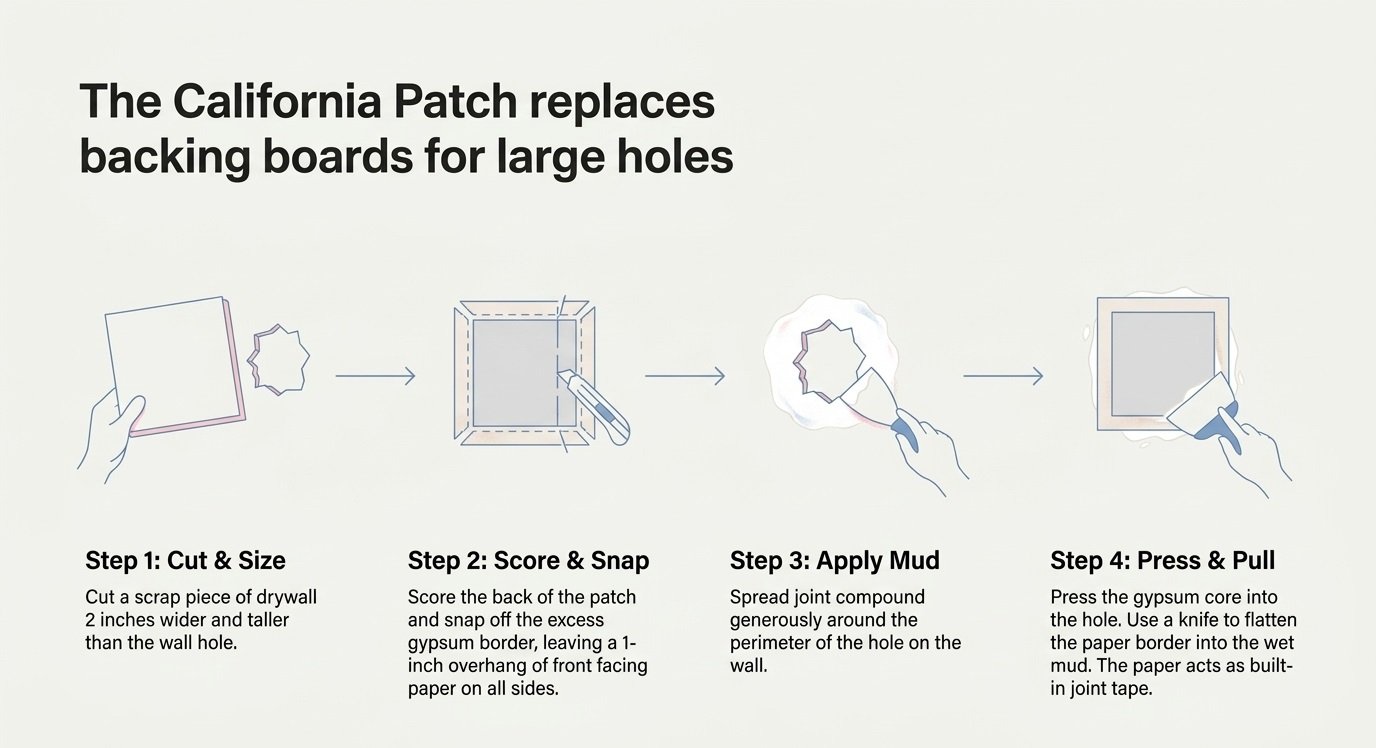
When you prep walls before painting, medium-sized holes present a unique challenge. The classic example is the hole left by a wandering, aggressively opened doorknob. Traditional adhesive metal mesh patches are popular, but they create a distinct, high profile on the wall that is incredibly difficult to feather out properly.
The superior alternative is the "Butterfly Patch," also commonly known in the trades as a California Patch. This method uses a piece of donor drywall cut slightly larger than the hole itself. The back gypsum is carefully scored and removed from the perimeter, leaving only the front face paper intact to act as built-in drywall tape.
| Damage Type | Recommended Fix | Feathering Difficulty |
|---|---|---|
| Nail Holes / Dents | Light spackle or joint compound | Low (Easy to sand flat) |
| Screw Pops | Re-anchor, dimple, and mud | Medium (Requires two coats) |
| Doorknob Holes (3"-5") | Butterfly Patch / California Patch | Medium (Requires paper seating) |
| Large Holes (6"+) | Wood backing block + new drywall cut | High (Requires full taping) |
"The professional trick is to cut your patch first, then hold it over the damage and trace its core onto the wall. Cut the wall to match that trace exactly. This ensures the patch sits perfectly flush. Apply compound to the back of the paper wings, press it into place, and squeegee the excess out. Your eye will never see this patch if it's sanded and feathered properly."
Key Tip: Seating the Wings
When using your knife to squeegee the excess mud out from behind the paper wings, apply firm pressure. You want the paper to sit as flat against the surrounding wall as physically possible to minimize the required top coats.
Texture Matching: The "Stipple" Secret
Even a perfectly flush, seamlessly feathered patch can end up looking like a smooth, dull blotch on your wall. This happens because the new patch lacks "stipple." Stipple is the subtle, pebbled texture left behind by paint rollers over years of previous paint applications.
If you paint a flawlessly smooth patch with a flat brush, the complete lack of texture will cause that specific area to catch the light differently. It will scream its presence to anyone walking into the room. To fix this, you must build texture during the priming phase.
Key Tip: The Primer Stipple Technique
Use a roller cover that matches the exact nap of the original application (usually a 3/8-inch or 1/2-inch nap). Apply two thin, careful coats of primer exclusively over the patched area. Allow the roller to slowly build up a texture that perfectly mimics the surrounding substrate.
Warning: Avoid the Halo Effect
Be highly careful not to continually hit the existing, undamaged wall around the patch with your primer roller. Doing so will inadvertently build up a raised "halo" of exceptionally thick stipple that completely defeats the purpose of your delicate blend. Keep the texture focused strictly on the smooth patch.
The Sanding Paradox: Why Less is More
After your joint compound is fully dry, it is time for the final mechanical step. However, aggressive sanding is the ultimate enemy of a flawless finish. Excessive force or improper grit selection can quickly "fuzz" or deeply tear the drywall paper surrounding the patch.
If you damage the paper face, you create a chaotic, fibrous texture that absolutely no amount of premium paint can fix. Sanding should never be a test of strength. It must be a controlled refinement, performed in gentle, light, circular motions.
| Sandpaper Grit | Primary Purpose | Motion Style |
|---|---|---|
| 100–120 Grit | For initial correction of thick ridges and high spots. | Firm, targeted strokes. |
| 120–150 Grit | For intermediate smoothing of seams and feathering the edges. | Light, sweeping arcs. |
| 180–220 Grit | For the final finishing pass to create a totally paint-ready finish. | Gentle, circular buffing. |
Mid-Article Summary: Follow the Progression
Never jump straight to a fine grit for heavy removal, and never finish a delicate patch with a coarse grit. Following the strict professional grit progression guarantees a surface that accepts primer uniformly without displaying deep scratch marks under the paint.
Sanding drywall produces incredibly fine dust that can linger in the air for days. Beyond the mess, there are serious health considerations when restoring older properties. You must prioritize safety above convenience.
Actionable Checklist: Dust Management & Safety
- Assume the risk: When working on homes built before 1978, always assume the dangerous presence of lead paint dust.
- Wear protection: Always wear a properly fitted, NIOSH-approved respirator—a standard paper surgical mask is entirely insufficient for fine dust.
- Use a HEPA vacuum: Clean the wall using a vacuum equipped specifically with a certified HEPA filter to catch microscopic particles.
- Never skip vacuuming: Never jump straight to wiping the wall with a damp cloth. This will just smear the fine grit and ruin your fresh compound work.
Bringing It All Together for a Perfect Finish
Taking the extra time to properly prep walls before painting is the only guaranteed way to achieve a professional-grade finish. It requires patience, the right tools, and an understanding of how paint interacts with different surface textures.
The Golden 90/10 Rule
A truly flawless, invisible finish is always 90% meticulous preparation and 10% application patience. Never rush the patching phase!
If the idea of feathering drywall mud and dealing with endless fine dust sounds overwhelming, you do not have to tackle it alone. Whether you need comprehensive interior painting services for a residential home, or large-scale commercial painting expertise, letting professionals handle the messy prep work guarantees an immaculate, long-lasting result.
Ready for a Flawless Transformation?
At Renova Co, we back our high-quality workmanship with a satisfaction guarantee. Our experienced team utilizes premium paints and industry-standard materials, committing strictly to precision and realistic timelines. Let us transform your space perfectly, the first time.
Visit us at 65 Maple Crescent, Hoppers Crossing, Australia | Mon–Sat, 8am–6pm