
Why Your New Paint Job Will Probably Fail (And How to Ensure It Doesn't)
Expert insights from the leaders in structural renovations and high-end aesthetic home upgrades.
Welcome to Flawless Preparation
If you are looking for Premium Painting Services Melbourne, understanding surface prep is your first critical step. At Renovaco Group, we take pride in delivering high-quality residential and commercial painting services that truly transform spaces.
With a team of skilled painters, premium materials, and a commitment to precision, we ensure every project is completed to the highest standard. Our focus is simple: clean work, reliable service, and results you can trust.
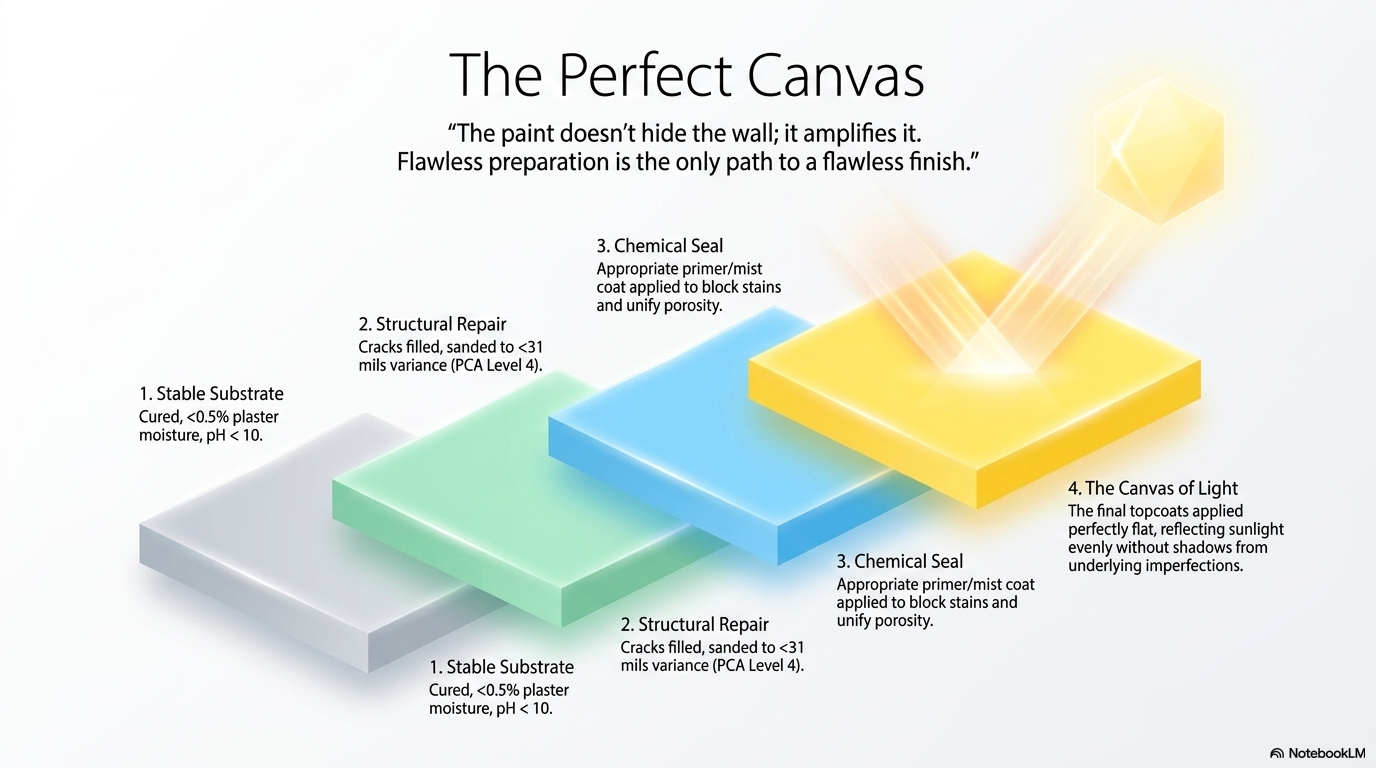
The Siren Song of the Color Swatch
There is a specific, seductive psychology at play in the paint aisle. We are easily captivated by the thousands of color swatches. We find ourselves envisioning a weekend transformation that ends with a flawless, designer-grade room.
However, for most DIYers and even some ill-equipped professionals, that vision quickly dissolves. It frequently turns into a nightmare of peeling, bubbling, or strictly "bumpy" surfaces that ruin the aesthetic. This is why engaging reliable Premium Painting Services Melbourne is vital.
The uncomfortable truth is that the most impactful part of a paint job is the work that disappears once the lid is opened. While homeowners are wired for the immediate gratification of a fresh color, a master decorator focuses on the substrate.
To ensure a professional-grade finish, you must look past the "swatch" and master the science of the surface underneath. Whether you are refreshing a single room or revamping an entire property, we bring professionalism, care, and attention to detail to every job.
Core Philosophy
Renovaco Group is dedicated to creating beautiful, long-lasting finishes. These premium finishes elevate your home and enhance your everyday living experience significantly.
The "70% Rule": Why You Aren't Actually Painting Yet
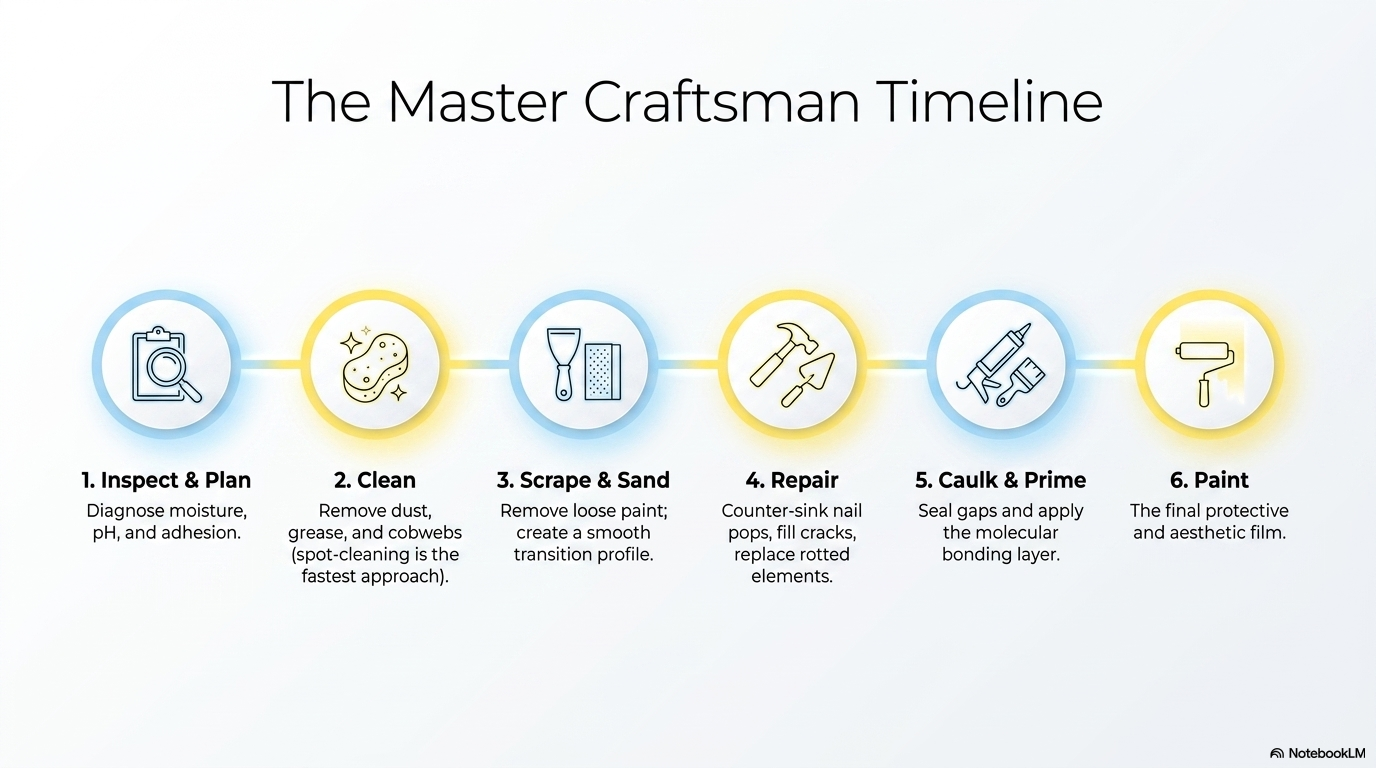
In the world of high-end restoration, we live by a metric synthesized by industry leaders like CertaPro Painters. Preparation constitutes 70% of a quality paint job. This is the foundation of our Premium Painting Services Melbourne protocol.
For the average homeowner, this concept is profoundly counter-intuitive. We want to see color on the walls immediately to validate our hard work. But the application of paint is actually the final engineering step, not the main event.
The "70% Rule" exists because paint is a film that requires a clean, dry, and sound environment to perform correctly. Rushing this stage leads directly to systemic coating failures.
Investing in prep provides three essential pillars of success. You cannot achieve longevity without strictly adhering to these fundamental requirements.
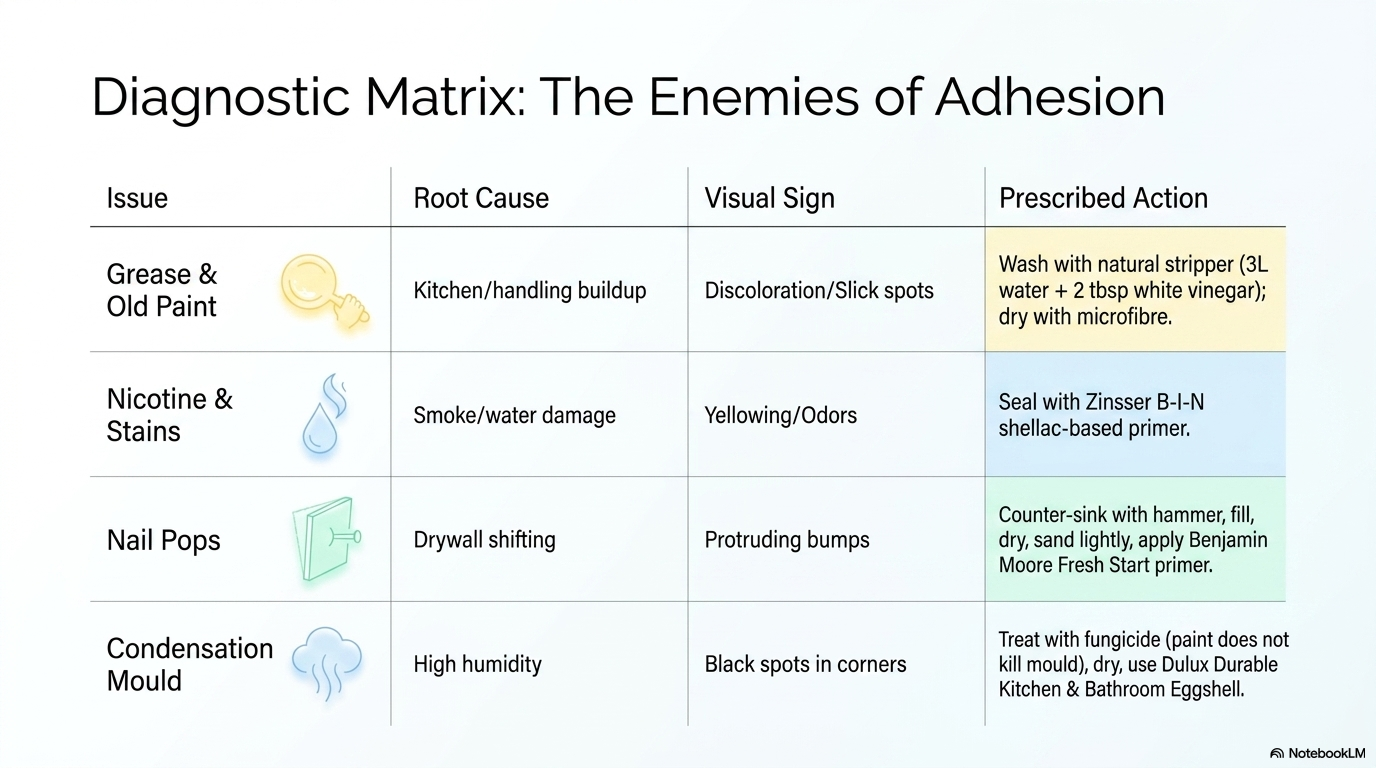
The Three Pillars of Surface Success
- Adhesion: Paint needs a mechanical grip. On surfaces with a Degree of Surface Degradation (DSD) of 0 or 1, this means removing dust and dirt. Without it, the bond fails, leading to chipping.
- Appearance: Fresh paint acts as a highlighter, not a mask. It will amplify every tiny nail hole or uneven texture visible on the wall.
- Lifespan: Proper sealing and priming protect the substrate from the silent killers of a finish: moisture and wear.
"Paint only performs as well as the surface underneath it."
— CertaPro Painters
The Mould Myth: Why Painting Over It Is a Trap
One of the most dangerous shortcuts in home restoration is the attempt to "hide" mould with a fresh coat of color. Standard paint does not kill mould; it effectively traps it.
This creates a severe Greenhouse Effect beneath the paint film. Underneath, the mould continues to thrive on the substrate, completely invisible to the homeowner.
This is often categorized by our Premium Painting Services Melbourne experts as DSD-3: Severely Deteriorated. The structural integrity of the wall is actively being consumed.
Before you even touch a brush, you must diagnose the moisture source accurately. Identifying the exact type of moisture is the first step toward a permanent cure.
Critical Warning
Never trap moisture beneath an acrylic or latex film. It guarantees massive adhesion failure, hazardous air quality, and expensive structural repairs down the line.
Watch: The Mould Elimination Protocol
Diagnosing Moisture Types
Condensation Mould
Black spots in corners where warm air meets cold surfaces. Usually indicates poor room ventilation.
Penetrating Damp
Irregular patches that worsen during rain, indicating external structural leaks in the masonry.
Rising Damp
Groundwater pulling up through masonry, often leaving tide marks and powdery salt residue behind.
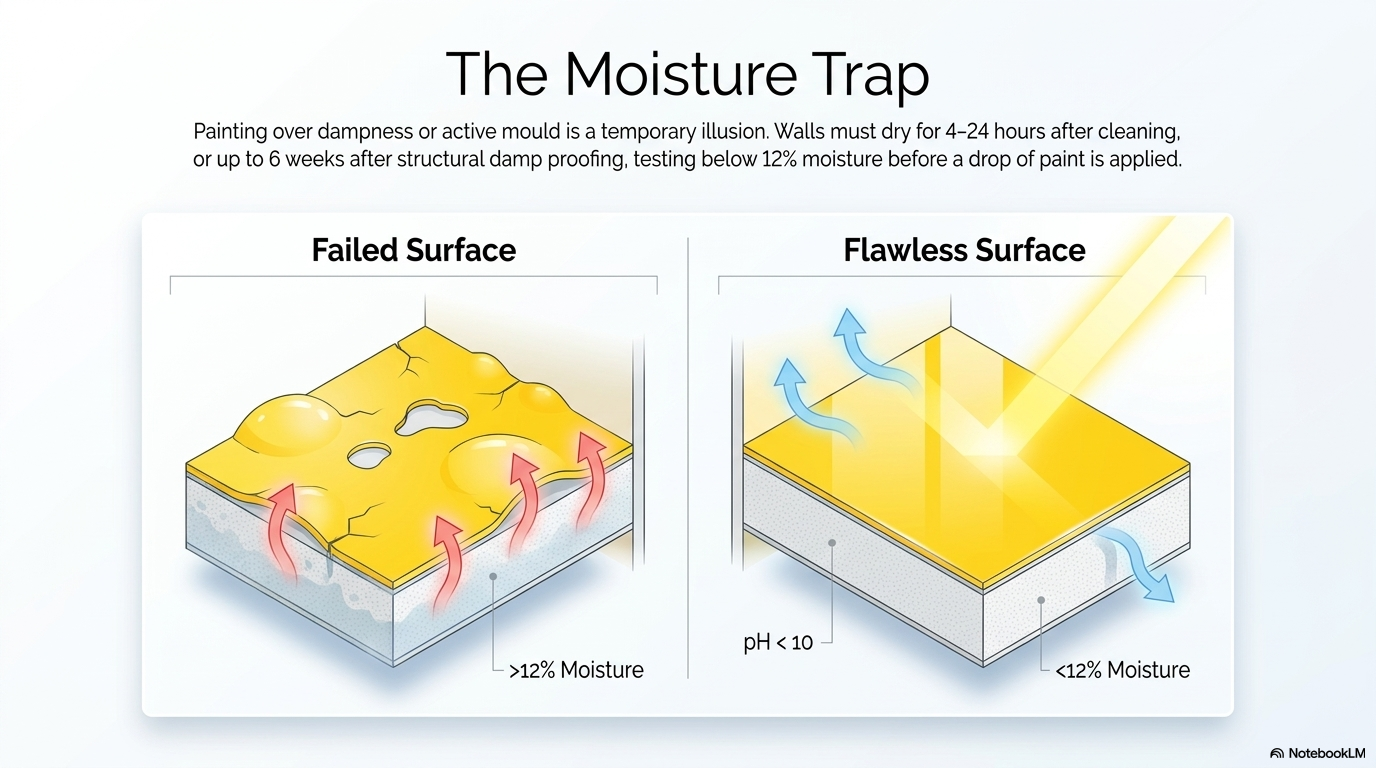
The Dulux Decorator Centre recommends a strict protocol for dealing with these hazards. First, treat the affected area with a high-grade fungicidal wash.
Most importantly, allow a 4 to 6-week drying period after any damp-proofing before decorating. Rushing this timeframe is the most common DIY error.
If you are trying to preserve existing paint, always test a small area first. Use a diluted solution to ensure you don't ruin the finish while cleaning.
"One of the biggest mistakes we see is assuming paint alone will fix the problem. It won't. If the source of moisture isn't addressed, the mould will return – often within weeks."
— Dulux Academy Expert
Phase One Summary
Never compromise on prep. Our Premium Painting Services Melbourne approach guarantees that 70% of the timeline is devoted to moisture eradication, mechanical adhesion, and substrate stability.
Zombie Glue: The Hidden Danger of Stripped Wallpaper
When you peel back old wallpaper, the wall often "looks" completely clean. Don't be fooled by this visual trickery.
Residual adhesive is a dormant contaminant that feels smooth to the touch. However, it will chemically reactivate the moment it touches the moisture in your new paint.
This results in a "bumpy mess" as the glue wakes up and creates globs. These globs form directly under your finish, ruining the aesthetic appeal entirely.
At this stage, we are often dealing with DSD-4 (Substrate Damage). The aggressive removal of paper has left the bare drywall core completely exposed to moisture.
Terminology: Zombie Glue
Dormant wallpaper adhesive paste that remains invisible on drywall. It absorbs the water content from fresh paint, swells, and destroys the new film's adhesion.
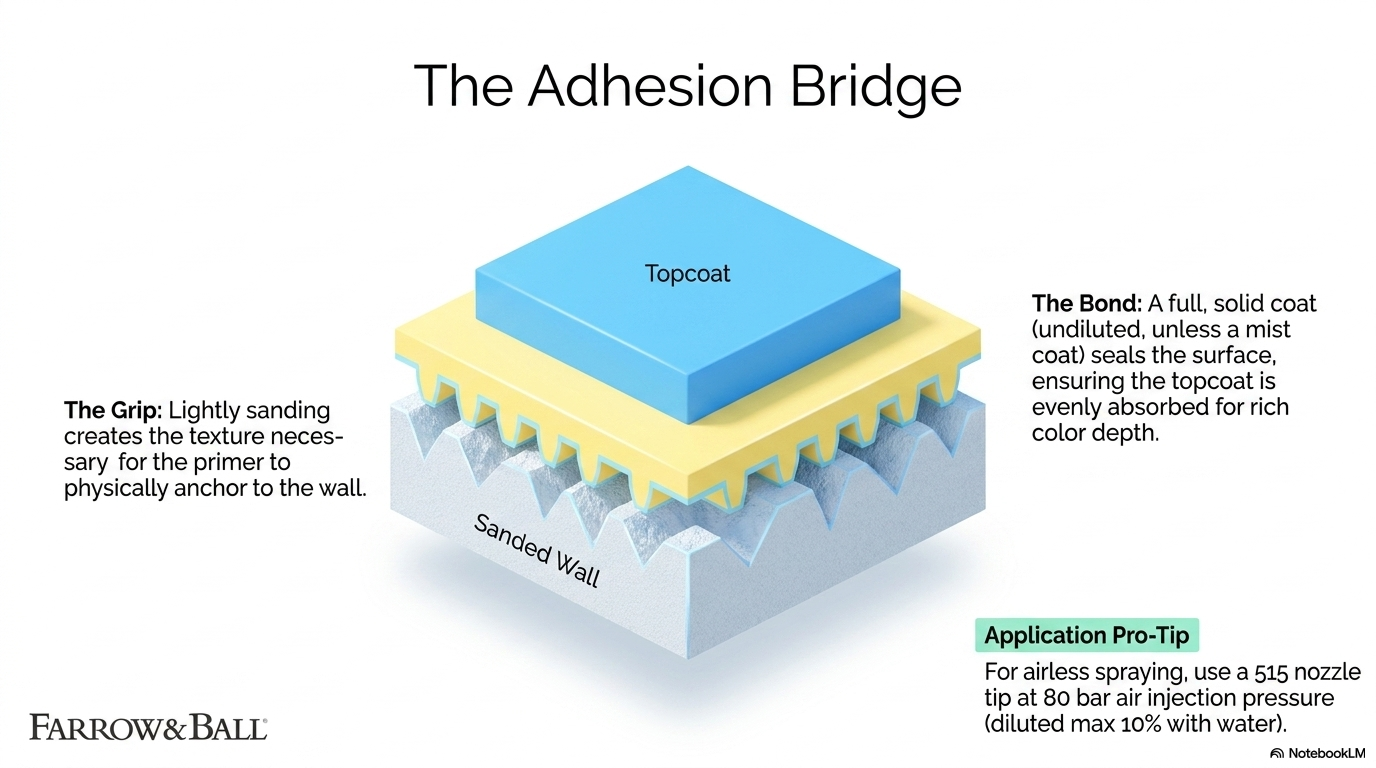
The professional solution is a rigorous two-step intervention. Skipping either step leads to immediate texture failure.
| Intervention Phase | Action Required | Expected Outcome |
|---|---|---|
| The Scrub | Use warm water and a sponge to agitate the surface. | Remove as much physical residue as possible from the drywall. |
| The Shield | Apply a dedicated "problem-surface sealer" or oil-based primer. | Blocks glue and seals torn, "fuzzy" spots of bare drywall core. |
Why The Shield Matters
This is critical because it doesn't just block the glue. It specifically seals those damaged areas of the drywall core that would otherwise soak up paint and swell uncontrollably.
The "Yogurt" Trick: Pro Skim Coating for Beginners
If you are staring at a heavy "knockdown" texture or a wall riddled with imperfections, you need a skim coat. This is mandatory for modern, sleek aesthetics.
Most DIYers fail terribly here because hand-troweling is an athletic skill. It takes years of daily practice to master the perfect pressure and angle.
Instead, our Premium Painting Services Melbourne team suggests the "Paint Roller Trick". This method was popularized by drywall expert Paul Peck for flawless applications.
The secret is all in the consistency of your compound. Utilizing the right viscosity is the difference between smooth walls and a wavy disaster.
Skim Coating Execution Steps
- Mix to Yogurt: Using an all-purpose joint compound, use a power mixer to thin the mud until it reaches a "yogurt-like consistency."
- Roll it On: To avoid the "wavy look" from inexperienced hand-troweling, use a 3/4 inch lambskin roller and a 5-gallon paint grid for consistent application.
- Uneven Pressure: Smooth it out with your 14-inch mud pan and 12-inch drywall knife. Put weight on the left side and slightly lift the right side.
Applying uneven pressure is the defining secret of the technique. It actively prevents the "lines" or ridges that usually plague beginner skim coating projects.
Following this exact protocol leaves a profile that is ready for a high-end finish. It elevates your surface preparation to professional standards.
Defining "Perfect": The PCA P14 Standard
To avoid aesthetic disputes and ensure a "properly painted surface," we look to the authorities. The Painting Contractors Association (PCA) P14 Standard sets the benchmark globally.
If your contract doesn't explicitly specify a preparation level, the industry standard assumes Level 2. This balances cost and appearance by correcting basic defects.
Level 2 generally corrects defects exceeding 1/8 inch. However, for truly transformative home restorations, Level 4 or Level 5 is strictly required.
Understanding these technical levels ensures you get exactly what you pay for. It is the core of our transparent Premium Painting Services Melbourne quoting process.
| PCA Standard Level | Detailed Description & Focus |
|---|---|
| Level 1: Basic | Focused solely on adhesion for DSD-0 or DSD-1 surfaces. Appearance is an afterthought, ideal for hidden utility spaces. |
| Level 2: Standard | Includes basic patching and "feather edge" sanding. The industry default for standard rentals and basic maintenance. |
| Level 3: Superior | Increased focus on smoothness and profile uniformity. Requires significant sanding and spotlight inspection. |
| Level 4: Supreme | The gold standard for DSD-0 to DSD-2 surfaces. All defects exceeding 1/32 inch are eliminated. Acceptance is based on "touch and feel" on high-touch areas. |
The Sensory Test
Acceptance at Level 4 is not just visual. It must be perfectly smooth to "touch and feel" on high-touch areas like handrails, doors, and intricate trim work.
Refresh. Renovate. Transform. Our Core Services
What the Renovaco team does for you extends far beyond the brush. We cover absolutely every aspect of high-end home improvement and full-scale renovations across Melbourne.
Transform your home with elite renovation and remodeling services you can explicitly trust. We deliver breathtaking, top-tier residential and commercial transformations.
Whether it is structural work or aesthetic enhancements, we offer a 100% satisfaction guarantee. Your vision is expertly executed by our dedicated master craftsmen.
Explore our comprehensive suite of improvement options. Beyond our Top-Rated Interior Painting Services Melbourne | Premium Painters, we offer total home solutions.
Conclusion: The Longevity of the Invisible
The success of your project is determined long before you select your final sheen. By shifting your perspective from the visible color to the invisible substrate, you take control.
You transform your wall from a temporary mask for underlying problems into a solid foundation for a lasting finish. Achieving a professional result requires this fundamental mindset shift.
Prioritize the exact science of the surface over the immediate gratification of the brush. Respect the strict 6-week drying times and commit to the "yogurt" consistency of your mud.
Never trust a wall that merely "looks" clean. Is your current wall just a mask, or is it a foundation? Choose the foundation, and your finish will stand the test of time.
Final Takeaway
When you demand perfection, don't leave prep to chance. Contact our Premium Painting Services Melbourne experts at Renovaco Group today. We guarantee structural integrity before a single drop of paint is applied.